1. 在 ADT 中安裝 Google Play Service
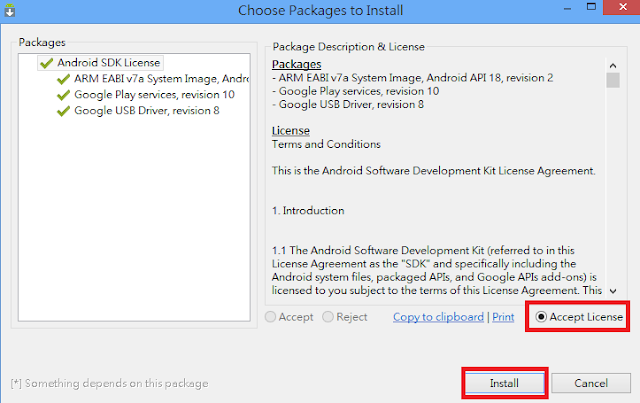
打開 ADT 中的 Android SDK Manager, 將 Extra 中的 Google Play service 勾選安裝。
選取 Accept License, 然後 Install。
接下來我們要把 Google Play service 匯入到專案中, 我們可以在 ADT 中選 File -> Import 開啟Import 畫面, 然後選取 "Existing Android Code Into Workspace"開啟匯入專案畫面。
在這個畫面我們選取 Google Play service 的安裝路徑, 預設路徑會在 : {ADT 路徑}\sdk\extras\google\google_play_services\libproject\google-play-services_lib。
選好路徑後在 Projects 中勾選起來, 要不要把這個專案 copy 到你的 workspace 就看你自己囉。選完後選 Finish 完成。完成後就可以在專案瀏覽器中看你 google-play-serives_lib 的專案。
接下來我們要讓我們要開發的專案去參考 google-play-services_lib 這個專案。我們可以在專案名稱上安滑鼠右鍵, 選取 Properties, 然後在 Android 分類中先按下 Add, 這時會開啟另一個視窗, 在視窗中點選 google-play-services_lib 項目。記得將 Is Library 勾選起來, 然後按下 Apply 套用, 最後按下 OK 鍵就完成了。
2. 申請 Google Map API Key
先用自己的 gmail 帳號登入 Google API Console 網站 , 登入後在 Services 中找出 Google Maps Android API v2, 將其開啟為 ON。
接下來我們要找出自己開發用的 debug.keystore, 我們可以在 ADT 中的 Windows->Preferences 中開啟下面這個畫面, 我們可以直接在 Android 分類中的 Build 項目中找出 SHA1 fingerprint, 那就是我們要的值。
我們把 SHA1 fingerprint 複製起來, 回到 Google API Console 網站。在 API Access 中, 先建立一個 Simple API Access, 可以找出 「Create new Android key...」 的按鈕, 開啟以下畫面。 將剛剛複製起來的 SHA1 fingerprint 貼上去就可以了, 然後接上分號「;」, 在分號之後接上你 Android 專案的 Package 名稱即可。
接下來你就可以看到 API Key 已經建立完成了。
3. 將 API Key 加入專案中
首先, 我們先將剛剛弄出來的 API Key 放到 Manifest 檔中。
<?xml version="1.0" encoding="utf-8"?>
<manifest xmlns:android="http://schemas.android.com/apk/res/android"
    package="com.example.mapsample"
    android:versionCode="1"
    android:versionName="1.0" >

    <uses-sdk
        android:minSdkVersion="8"
        android:targetSdkVersion="17" />

    <uses-permission android:name="android.permission.INTERNET" />
    <uses-permission android:name="android.permission.ACCESS_NETWORK_STATE" />
    <uses-permission android:name="android.permission.WRITE_EXTERNAL_STORAGE" />
    <uses-permission android:name="com.google.android.providers.gsf.permission.READ_GSERVICES" />
 <!-- 以下兩個權限非必需, 但建議加上 -->
    <uses-permission android:name="android.permission.ACCESS_COARSE_LOCATION" />
    <uses-permission android:name="android.permission.ACCESS_FINE_LOCATION" />

    <uses-feature
        android:glEsVersion="0x00020000"
        android:required="true" />

    <application
        android:allowBackup="true"
        android:icon="@drawable/ic_launcher"
        android:label="@string/app_name"
        android:theme="@style/AppTheme" >
        <activity
            android:name="com.example.mapsample.MainActivity"
            android:label="@string/app_name" >
            <intent-filter>
                <action android:name="android.intent.action.MAIN" />

                <category android:name="android.intent.category.LAUNCHER" />
            </intent-filter>
        </activity>

        <meta-data
            android:name="com.google.android.maps.v2.API_KEY"
            android:value="AIzaSyAUo1DxxxxxxxxxxxxxxxxxxxxyixaP6dU" />
    </application>

</manifest>
首先, API Key 要放在紅字的部份, 請貼上你剛剛申請的 API Key。
藍字是權限的部份。因為 Google Map 需要從線上下載地圖, 所以在權限上需要網路存取權限。另外下載的圖資會放在 External storage 中, 所以也需要 External Storage 的權限。最後再加上取得 GPS 的權限。另外兩個非必須的權限是利用網路定位, 加上是比較好的。
紫字的部份, 聽說是GL繪圖用的參數, 這部份還沒有仔細研究, 先加上去。
把 Manifest 設定好後, 接下來處理 Activity 的程式。Google Map v2 是利用 Google 已經寫好的 MapFragment 套在 Activity 中, 所以一般 API Level 需要支援到 11 以上。還好 Google 有支援 SupportMapFragment 物件, 所以我在 Manifest 檔中只設定到 Level 8 就可以了。
首先我們在 layout.xml 檔中加入一個 FrameLayout 來塞 Fragment。
<RelativeLayout xmlns:android="http://schemas.android.com/apk/res/android"
    xmlns:tools="http://schemas.android.com/tools"
    android:layout_width="match_parent"
    android:layout_height="match_parent"
    android:paddingBottom="@dimen/activity_vertical_margin"
    android:paddingLeft="@dimen/activity_horizontal_margin"
    android:paddingRight="@dimen/activity_horizontal_margin"
    android:paddingTop="@dimen/activity_vertical_margin"
    tools:context=".MainActivity" >

    <TextView
        android:layout_width="wrap_content"
        android:layout_height="wrap_content"
        android:text="@string/hello_world" />

    <FrameLayout
        android:id="@+id/layoutMap"
        android:layout_width="match_parent"
        android:layout_height="match_parent" >
    </FrameLayout>
</RelativeLayout>
接下來在 Activity 的 class 檔中, 一樣是利用 FragmentManager 與 FragmentTransaction 將 SupportMapFragment 帶入畫面中。
package com.example.mapsample;

import android.os.Bundle;
import android.support.v4.app.FragmentActivity;
import android.support.v4.app.FragmentManager;
import android.support.v4.app.FragmentTransaction;
import android.view.LayoutInflater;
import android.view.View;
import android.view.ViewGroup;

import com.google.android.gms.maps.CameraUpdateFactory;
import com.google.android.gms.maps.GoogleMap;
import com.google.android.gms.maps.SupportMapFragment;
import com.google.android.gms.maps.model.LatLng;
import com.google.android.gms.maps.model.MarkerOptions;

public class MainActivity extends FragmentActivity {

 private static final LatLng LOCATION = new LatLng(25.047795, 121.516900);

 @Override
 protected void onCreate(Bundle savedInstanceState) {
  super.onCreate(savedInstanceState);
  setContentView(R.layout.activity_main);

  FragmentManager fm = this.getSupportFragmentManager();
  SupportMapFragment mapFragment = new SupportMapFragment() {
   @Override
   public View onCreateView(LayoutInflater inflater,
     ViewGroup container, Bundle savedInstanceState) {
    View view = super.onCreateView(inflater, container,
      savedInstanceState);

    GoogleMap map = this.getMap();

    MarkerOptions options = new MarkerOptions();
    options.position(LOCATION);
    options.title("台北火車站.");
    options.snippet("Taipei Railway Station.");
    map.addMarker(options);

    map.moveCamera(CameraUpdateFactory.newLatLngZoom(LOCATION, 16));

    return view;
   }
  };
  FragmentTransaction ft = fm.beginTransaction();
  ft.add(R.id.layoutMap, mapFragment);
  ft.commit();
 }
}
在這個範例中我先把座標定在台北火車站, 是固定寫死的。當然如果熟悉 GPS 取得座標的方法的話也可以透過 GPS 來取得經緯度座標。這段程式和一般的 Fragment 使用方式沒什麼太大的差異。
但要注意的是, 我們對 GoogleMap 的操作是透過 com.google.android.gms.maps.GoogleMap 物件。這個物件需要透過 MapFragment/SupportMapFragment 物件的 getMap() 方法來取得。但在 Fragemnt 中必須要在執行 onCreateView 事件後才會產生 GoogleMap 的實體, 所以如果我們直接在 new MapFragment() 後直接呼叫 getMap() 方法, 會傳回 null 值, 這時進行操作就會產生 NullPointException 的錯誤。所以在這個範例中, 我是將操作的動作寫在 MapFragment 的 onCreateView() 之中。
寫完後以手機當模擬器執行, 應該就可以看到這段程式的結果。
目前這段程式應該還無法在模擬器上執行, 主要是因為模擬器上沒有 Google Play Service 和 Google Play Store。先寫到這, 大家興趣可以試試。
範例程式在此下載。但是記得要將 Google Play Service 依上述步驟加入專案, 並且將 API Key 更換後才能執行。


沒有留言:
張貼留言